
Hybrid Cloud Ops Extension for Zabbix
HyClops for Zabbix
About
HyClops is Zabbix extention that provide some functions to management Amazon EC2 and VMware vSphere on Zabbix. It extends Zabbix capability by using externalscripts, zabbix sender and message queue.
Our concept:
- To realize integrated management for Hybrid Cloud environments.
- To realize automation of many operations.
- To realize the autonomous system.
HyClops has some features of integration & automation. These features are the first step for our concept.
HyClops provides following features:
- Automatically register EC2 instances and vSphere virtual machines to zabbix.
- Monitor basic instance informations without zabbix agent. (using EC2 API or vSphere API)
- Start/stop instances from Zabbix global script.
- Display EC2 and vSphere informations on Zabbix dashboard by replacing dashboard to customized one.
- (Experiments) connect SSH console of each instances from customized dashboard by using Gate One.
Release Notes
- 2013/12/12 ver.0.2.0
- Support Zabbix2.2.
- Change the logic of automatic allocation Templates for unknown platform hosts.
- Add a interface column to vSphere information panel in Zabbix dashboard.
- 2013/07/12 ver.0.1.0
- Support Amazon EC2 & VMware vSphere ESXi management.
- Register instances info automatically.
- Execute start/stop/reboot command to multi instances.
- Connect to ssh console of each instances at Web browser.
Architecture
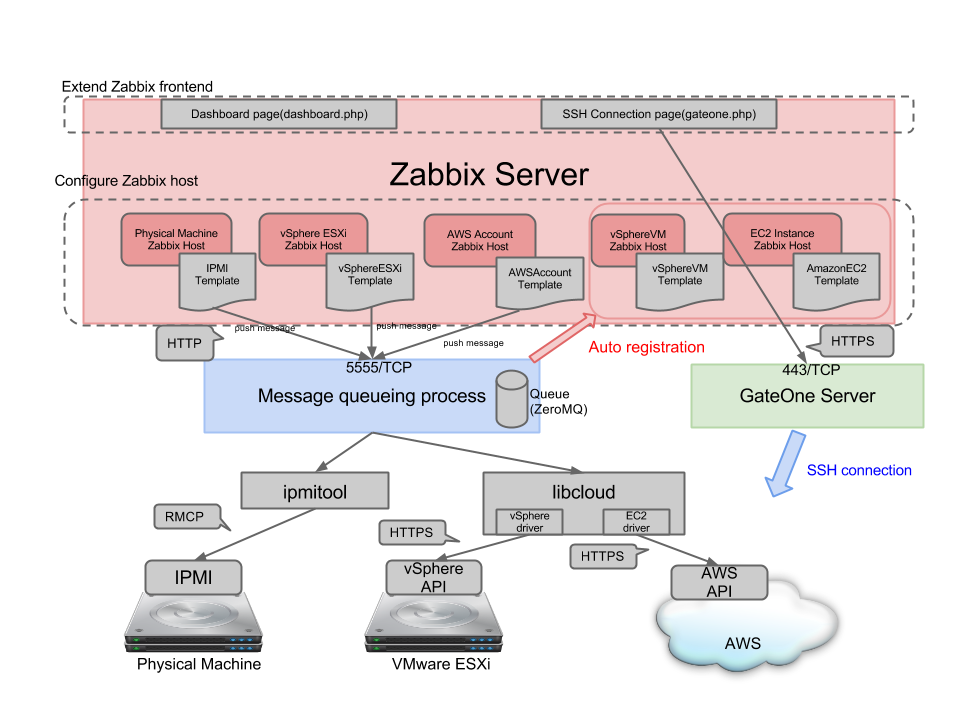
HyClops is constructed by three components.
Zabbix Server component
- Modifying original Zabbix dashboard.
- Monitoring hybrid cloud environments constantly by using Zabbix external scripts feature.
- Controlling instance at each environments by using Zabbix global scripts feature.
Message queueing process component
- Running message queueing process ( ZeroMQ ) (default 5555/TCP).
- Pulling message from queue regularly, and access to API of each environments (vSphere API or AWS API) according to contents of message.
- Sending data to Zabbix by using zabbix sender.
GateOne Server component
- Managing some SSH connections.
- Managing some authentication keys.
Install
Requirements
The following requirements exist for running this product:
- Zabbix (>= 2.0) with zabbix sender
- Python (>= 2.6) (developed on python 2.7)
- python-setuptools
- ZeroMQ
- ipmitool
- GateOne (if you want to use ssh console from browser)
Install Zabbix Server & Zabbix Agent
See the Zabbix official manual. https://www.zabbix.com/documentation/2.0/manual/installation
Zabbix Agent is used for HyClops & GateOne process monitoring.
Create value mappings
Configure in Zabbix frontend. Open “Administration > General > Value mapping”
Script return code
| raw data | mapping string |
|---|---|
| 0 | success |
| 1 | failure |
Libcloud Node State
| raw data | mapping string |
|---|---|
| 0 | running |
| 1 | rebooting |
| 2 | terminated |
| 3 | pending |
| 4 | stopped |
Install related package
In case of RHEL/CentOS
Add ZeroMQ package repository (This is the process for CentOS6.)
$ sudo curl http://download.opensuse.org/repositories/home:/fengshuo:/zeromq/CentOS_CentOS-6/home:fengshuo:zeromq.repo > /etc/yum.repos.d/zeromq.repo
Install related package
$ sudo yum install gcc gcc-c++ zeromq zeromq-devel python-devel python-setuptools ipmitool
In case of Ubuntu
$ sudo apt-get install gcc g++ libzmq1 ipmitool python-dev python-setuptools
Install python module
$ sudo pip install apache-libcloud==0.13.2 zabbix-api pyzmq psphere python-daemon==1.6 configobj
If python version < 2.7
$ sudo pip install ordereddict argparse
If you want to use the script collecting AWS billing data
$ sudo pip install boto
Install GateOne (Optional)
See the GateOne official manual. http://liftoff.github.io/GateOne/About/index.html
Setting GateOne (configure API authentication)
$ sudo /opt/gateone/gateone.py --auth=api --origins="http://zabbix-server-frontend/"
$ sudo /opt/gateone/gateone.py --new_api_key
$ sudo service gateone start
In case of RHEL/CentOS
$ sudo chkconfig gateone on
In case of Ubuntu
$ sudo update-rc.d gateone defaults
Install HyClops
$ wget https://github.com/tech-sketch/hyclops/archive/[version no.].tar.gz
$ tar zxvf hyclops-[version no.].tar.gz
$ cd hyclops-[version no.]
$ sudo python setup.py install
Copy files
$ sudo cp -a ./misc/init.d/redhat/hyclops /etc/init.d/  # in case of SysV init
$ sudo cp -a ./misc/init.d/ubuntu/hyclops.conf /etc/init/   # in case of Upstart
$ sudo cp -a ./misc/externalscripts/* [externalscripts dir] (/etc/zabbix/externalscripts/ etc...)
Setting permissions
$ sudo chown zabbix:zabbix [externalscripts dir](/etc/zabbix/externalscripts/ etc...)/*
$ sudo chmod u+x [externalscripts dir](/etc/zabbix/externalscripts/ etc...)/*
Setting HyClops
$ sudo vim /opt/hyclops/hyclops.conf
[hyclops]
# listen_address = *          # listen on all network interface
# listen_address = 127.0.0.1  # listen on specific network interface
listen_address = 127.0.0.1  # hyclops listhen IP address (default 127.0.0.1)
listen_port = 5555  # hyclops listen port (default 5555)
[zabbix]
zabbix_server = 127.0.0.1  # zabbix server IP address/hostname
zabbix_port = 10051  # zabbix server listen port
frontend_url = http://%(zabbix_server)s/zabbix  # zabbix server frontend url
zabbix_user = Admin   # zabbix user (for using host.create API)
zabbix_password = zabbix   # zabbix user password
zabbix_sender = /usr/bin/zabbix_sender   # zabbix sender binary path

[ipmi]
ipmitool = /usr/bin/ipmitool   # ipmitool command path

[logging]
log_level = WARNING   # hyclops log level
log_file = /tmp/hyclops.log  # hyclops log output file path

[environments]
# http_proxy = http://proxy.example.com:8080/  # setting http_proxy
# https_proxy = http://proxy.example.com:8080/  # setting https_proxy
# no_proxy = "localhost,127.0.0.1"  # setting proxy exclude host
Setting SELinux(In case of Enforce SELinux)
HyClops process outputs logs to /opt/hyclops/logs/hyclops_server.log (default setting). There are 2 process writing to this log.
- HyClops daemon process
- Apache daemon process (when zabbix globalscripts are executed)
So, Both of HyClops process user and Apache process user must be able to write to this log.
$ sudo chcon -R -t public_content_rw_t /opt/hyclops/logs/
$ sudo chcon -R -t public_content_rw_t /tmp/suds/ # for tmp file when executing vSphere operation
$ sudo setsebool -P allow_httpd_anon_write 1
Server init setting
In case of SysV init
$ sudo chkconfig --add hyclops
$ sudo chkconfig hyclops on
$ sudo service hyclops start
In case of Upstart
$ sudo initctl start hyclops
Replace some Zabbix dashboard files
$ sudo python setup.py replace -d (zabbix frontend document root path) --zabbix-version=(2.0 or 2.2)
Import Zabbix templates,scripts and globalmacro data
Import three data.
- misc/import_data/templates.xml
- misc/import_data/globalscripts.xml
- misc/import_data/globalmacros.xml
Import process is automated by script.
$ sudo python setup.py import -f <zabbix frontend url> -u <zabbix username> -p <zabbix password>
(e.g. python setup.py import -f http://localhost/zabbix -u Admin -p zabbix)
Setting cron script
Hyclops has a feature to move hosts which not exist to “Not exist hosts” Zabbix hostgroup. If you want to remove these not exist hosts automatically, you should set cron script.
$ sudo crontab -u hyclops -e
*/5 * * * * python /opt/hyclops/cron_scripts/delete_not_exist_hosts.py
This script is set to remove after 30 days in default. If you want to change period, please set “-d” option (e.g. “-d 10” is setting to remove after 10days).
Configure
Configure in Zabbix frontend.
Setting global macros
| macro | value |
|---|---|
| {$GATEONE_URL} | GateOne Server URL (e.g. https://gateone-server) |
| {$GATEONE_KEY} | GateOne API key |
| {$GATEONE_SECRET} | GateOne Secret key |
| {$HYCLOPS_SERVER} | HyClops listen IPaddress/hostname (e.g. 127.0.0.1) |
| {$HYCLOPS_PORT} | HyClops listen port (e.g. 5555) |
(API key and secret key are described in /opt/gateone/server.conf)
Create zabbix hosts
For AWS EC2
| setting items | setting values | |
|---|---|---|
| Templates | AWSAccount | |
| Macros | (Required) {$KEY} | AWS Access key |
| (Required) {$SECRET} | AWS Secret key | |
| (Optional) {$VM_TEMPLATES} | Template names for All instances (separated by ",") | |
| (Optional) {$VM_TEMPLATES_WINDOWS} | Template names for Windows instances (separated by ",") | |
| (Optional) {$VM_TEMPLATES_LINUX} | Template names for Not Windows instances (separated by ",") | |
For vSphere ESXi
| setting items | setting values | |
|---|---|---|
| Templates | vSphereESXi | |
| SNMP interfaces | vSphere ESXi management interface | |
| Macros | (Required) {$KEY} | ESXi username |
| (Required) {$SECRET} | ESXi password | |
| (Optional) {$VM_TEMPLATES} | Template names for All VMs(separated by ",") | |
| (Optional) {$VM_TEMPLATES_WINDOWS} | Template names for Windows VMs(separated by ",") | |
| (Optional) {$VM_TEMPLATES_LINUX} | Template names for Not Windows VMs(separated by ",") | |
For Physical Machine
| setting items | setting values |
|---|---|
| Templates | IPMI |
| IPMI interfaces | IPMI interface |
| IPMI settings | same of IPMI monitoring settings |
For HyClops Server & GateOne Server
If HyClops Server and GateOne Server is running on different from Zabbix Server, you should register each server hosts. Please assign “HyClops Server”,”GateOne Server” templates to these hosts. These templates include process monitoring item & log monitoring item.
Usage
Monitoring each environments
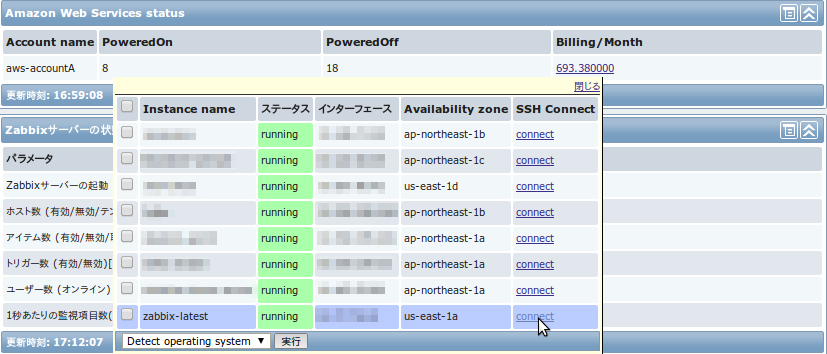
Visit Zabbix dashboard. Added some areas in dashboard (vSphere status, Amazon Web Services status,Pysical Machine status).
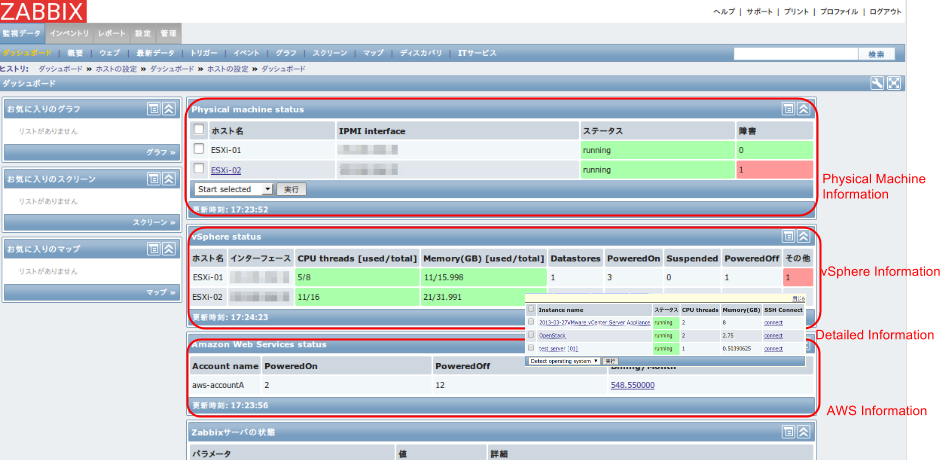
This area shows some information for each environments. For example, in case of AWS, instance number are displayed for each state(Powered on/Powered off). When you mouseover and click the number, you can see the list of instances. And more, when you mouseover each instance name, you can see the more detail information.
Controlling instances (Start/Stop/Reboot)
If you want to control instances, you can execute in Zabbix dashboard.
- Check box on control target instance(you can select multi instances.)
- Select control script
- Execute
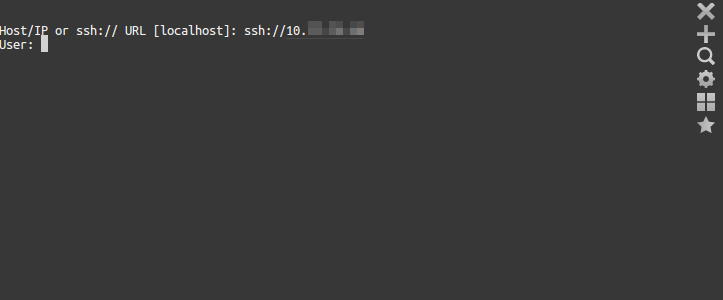
Connecting ssh console
At Zabbix dashboard, you can select vSphere VM or Amazon EC2 instance(Powered on status).
License
HyClops for Zabbix is released under the GNU General Public License version2.
The GPL official full text is published at this link.